The Divi Gallery module allows you to display image titles and captions when using the grid layout, but not when using the slider. There is a very simple way to grab your titles and display them over your images while still allowing the lightbox feature to function.
In this tutorial I’m going to show you how.
Let’s get started.
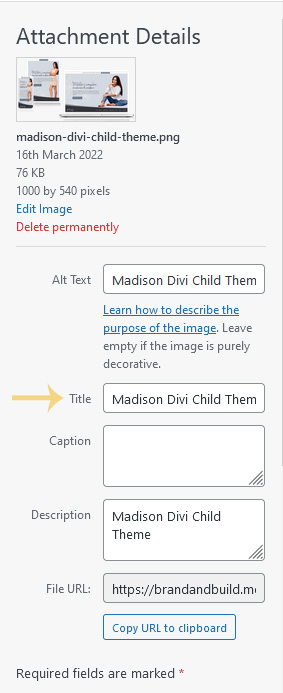
Make sure your images have titles.
The first thing you need to do is make sure the images you want to add to your gallery have a title. You set this in the media library, preferably as soon as you upload an image. This will default to whatever you named your image file, so be sure to change it to something more readable. While you’re there, don’t forget to add alt text and a description.
Add a class to your gallery module.
Once you’ve added the gallery module to the page, included all the images you want to display, and set the layout to slider, add the class ‘bb-gallery-slider’ in the advanced tab.

Add a little CSS.
In your child theme style sheet, or Divi > Theme Options > Custom CSS if you aren’t using a child theme, add the following CSS.
.bb-gallery-slider .et_pb_gallery_image a[title]::after {
    content: attr(title);
    position: absolute;
    top: 50%;
    left: 50%;
    transform: translateX(-50%) translateY(-50%);
    padding: 20px;
    color: #000;
    background: rgba(255, 255, 255, 0.8);
    text-align: center;
    line-height: 1.2em;
    font-family: 'Poppins', Helvetica, Arial, Lucida, sans-serif;
    text-transform: uppercase;
    font-weight: 600;
}
Here is what we’re doing:
content: attr(title);
position: absolute;
top: 50%;
left: 50%;
transform: translateX(-50%) translateY(-50%);
padding: 20px;
The first 6 properties are all you actually need.
- Content is grabbing the title attribute from the image file and adding it to an ‘after’ pseudo element on the image link.
- Position displays the title over the image
- Top and Left, along with Transform move the title to the center of the image. You can play with the values if you want the title aligned to the top or the bottom.
- Padding adds some space around the title in case you want to add a background, which we come to next…
color: #000;
background: rgba(255, 255, 255, 0.8);
text-align: center;
line-height: 1.2em;
font-family: 'Poppins', Helvetica, Arial, Lucida, sans-serif;
text-transform: uppercase;
font-weight: 600;
Background adds a colour to the container the title text displays inside. I have a semi-transparent white, but you can change or remove this. If you want a larger or smaller box, adjust the padding value.
The remaining properties are to style the text. As it’s a link, it will default to whatever style you have your links set to in the theme customiser. If that’s okay, you can omit these properties, but include them if you want different styling.
One value you’ll likely want to keep is the line-height. If you have long titles that wrap on smaller screens you’ll need line-height so words don’t sit on top of each other.
Now your titles should be display over your gallery images like this…
That’s it, all done!
Michelle x
P.S. Want to do more with sliders without using a plugin? Check out my Carousel Layout Kit.
Pro Pass Membership
Want access to all current and future child themes, kits, and our B&B Blocks library for Kadence for one low annual price?